
In automotive digital merchandising, your virtual showroom is often the only commitment you get from a modern car buyer. Before a customer steps onto your physical lot, they have likely spent many hours scrolling through Vehicle Detail Pages (VDPs) on their phones. So nowadays it is very important to standardize your online store for a vehicle dealership business.
When your online inventory looks consistent, professional, and standardized, it builds instant psychological trust with your potential customers. When it looks chaotic—featuring a mix of cloudy skies, cluttered service bays, random angles, and distracting background traffic—it signals a lack of professionalism.
Standardizing your dealership photos isn’t just a visual choice; it directly correlates with higher VDP engagement, lower bounce rates, and faster turn rates. Here is an inclusive, step-by-step guide to building a bulletproof photography standard for your dealership.
1. Hire a professional vehicle photographer:
To standardize your vehicle photos for your online inventory, you need to hire a professional vehicle photographer. A professional photographer will show professionalism in your automotive business by taking accurate photos of your vehicles. You can hire a vehicle photographer on a contract basis for per-vehicle shots or a permanent staff member for your automotive business.
2. Establish the “Hero” Angles and Shot List:
Consistency starts with a strict, repeatable blueprint. If your photographers are guessing which angle to shoot next, your inventory will never look uniform. You need a standardized shot list that every vehicle must undergo, regardless of whether it is a personal car or a heavy-duty truck.
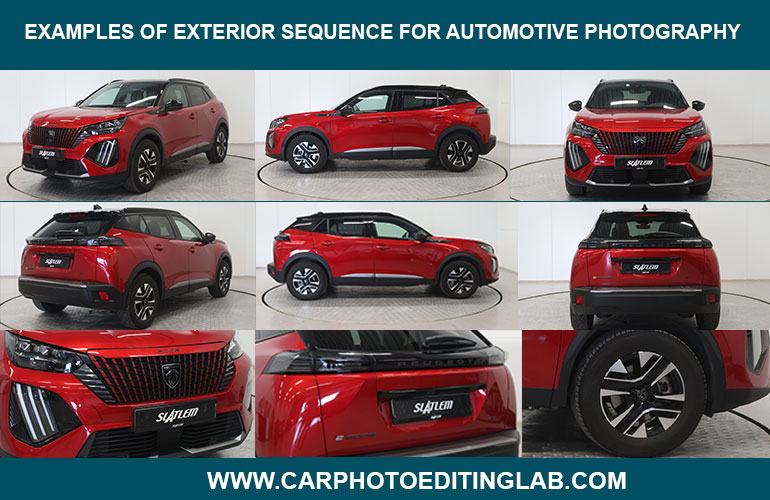
Normally, a standard 20-30 shot sequence should always begin with the identical “Hero Shot”—usually the front three-quarter driver’s side angle. This is the thumbnail image that appears in search results, and it must be uniform across every single listing.
The Standardized Exterior Sequence:
Shot 1: Front 3/4 view (Driver’s side)
Shot 2: Straight-on front profile
Shot 3: Front 3/4 view (Passenger side)
Shot 4: Direct side profile (Passenger side)
Shot 5: Rear 3/4 view (Passenger side)
Shot 6: Straight-on rear profile
Shot 7: Rear 3/4 view (Driver’s side)
Shot 8: Direct side profile (Driver’s side)
Shot 9: Wheel and tire detail (Showing tread depth and rim condition)
Shot 10: Engine bay (Cleaned and detailed)
Here are some examples of exterior sequence:
Car Photo Editing Lab
The Standardized Interior Sequence:
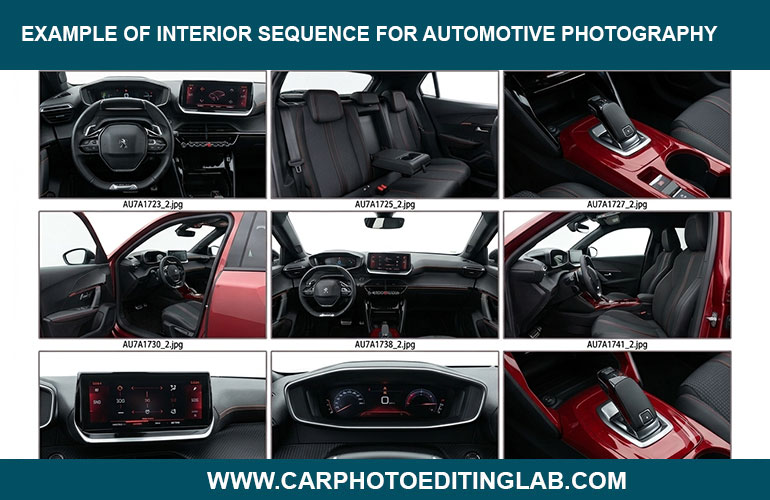
Shot 11: Open the driver’s door, showing the cockpit layout
Shot 12: Steering wheel and instrument cluster (Engine running to show no warning lights)
Shot 13: Center console, infotainment screen, and gear shifter
Shot 14: Front seats from a rear-passenger perspective
Shot 15: Rear passenger seating area
Shot 16: Odometer verification close-up
Shot 17: Panoramic sunroof or roof lining (if applicable)
Shot 18: Trunk/Cargo area (with seats folded up and down)
Shot 19: VIN plate sticker (for transparency)
Shot 20: Key fobs (showing both keys if available)
Here are some examples of interior sequence:
Car Photo Editing Lab
To enforce this, paint physical marker lines on your photography lot or install a mobile app overlay that forces the photographer to line up the car’s tires with a digital template grid on the screen.
3. Control Your Lighting and Environment:
Nature is the enemy of standardized photography. A car shot at 8:00 AM on a crisp, clear day will look vastly different from a car shot at 3:00 PM on a gloomy, overcast. Harsh midday sunlight introduces aggressive reflections and deep, ugly shadows that mask the vehicle’s body lines. So a professional photographer will know which angles and times are best for the vehicle photos.
Shooting Outdoors
If you shoot outdoors, choose a dedicated “Photo Zone.” This area should be entirely clear of light poles, garbage cans, and other parked inventory.
- Positioning: Always park the vehicle so the sun is behind the photographer or hitting the vehicle at a 45-degree angle. Avoid direct backlighting, which turns the car into a dark silhouette.
- Timing: Try to batch your photography during the “Golden Hours” (early morning or late afternoon) or on consistently overcast days, which act as a suitable time for your vehicle photos.
Shooting Indoors (The Ultimate Standard)
If volume permits, transition to an indoor photo bay. A dedicated bay with a painted white or gray floor, neutral walls, and fixed LED diffused ceiling arrays ensures that every vehicle looks identical, regardless of the weather outside. If you want a perfect look for your vehicle photo, you should prioritize shooting in an indoor area.
4. Vehicle Preparation: The “Zero-Draft” Rule:
No amount of high-end photography or post-processing can hide a lazy, detail job. Before a vehicle ever rolls into the photo frame, it must pass a strict staging checklist:
- The Alignment Rule: Straighten the front wheels perfectly for profile shots, or turn them out at a precise 45-degree angle to showcase the wheel face for the front three-quarter hero shot.
- Interior cleaning: Remove all plastic floor protectors, dealer tags, and trash. Ensure the steering wheel is perfectly straight, all air vents are pointed in the same direction, and the dashboard screen is wiped clean of fingerprints.
- Tech Settings: Turn off the hazard lights, but turn on the daytime running lights (DRLs) or parking lights to give the car an active, appealing presence.
5. Implement Post-Processing and Background Replacement:
Before using your vehicle photos for web or print media, you need to implement a post-production service. Even with a committed outdoor spot, you cannot manage changing seasons, construction, or the gray pavement turning into a wet mirror during rainstorms. This is where professional automotive photo editing and background replacement become non-negotiable tools for standardization.
The vehicle background replacement process changes the look of your vehicle visualization to present to your potential customers. By utilizing a professional background replacement service, you can immediately strip away the chaotic reality of a busy dealership lot and replace it with a clean, branded, virtual showroom.
Key Elements of High-Quality Background Replacement:
- Realistic Floor Shadows: Completely removing a background without adding a realistic drop shadow or ground reflection makes the car look like it is floating cartoonishly in space. The shadow must match the orientation of the vehicle.
- Window Transparency: A common mistake in cheap editing is failing to cut out the old background visible through the car windows. Ensure your editing process cuts through the glass to show the new background seamlessly. So you must implement the window transparency for your better vehicle background replacement.
- Brand Uniformity: Use a neutral, modern backdrop and subtly incorporate your dealership’s logo or slogan onto the wall. This turns every vehicle image into a branded digital asset that competitors cannot easily copy.
- Privacy and Compliance: As part of the post-processing loop, ensure that license plates are uniformly covered with a sleek, branded dealer plate insert, which protects your vehicle privacy and compliance.
Conclusion: Build a Repeatable System
Standardizing dealership photos isn’t about buying the most expensive DSLR camera; it is about creating an immovable system. By enforcing a strict shot list, controlling the vehicle setup, and utilizing professional background replacement to eliminate environmental variables, you create a seamless browsing experience.
When you want standardized dealership photos, inventory looks consistent, your dealership looks professional, your digital merchandising shines, and your vehicles move off the lot faster.